Homemade Eggnog (cooked in the Vita-Mix!)

God, it’s been a while, hasn’t it?
But I’m back in that place where I need to not lose track of a really good recipe I will no doubt use many times in the future, like my homemade palaczinta (Hungarian pancakes) or Instant Pot kheer (Indian cardamom rice pudding).
This time: eggnog. Not just any eggnog, but actual cooked eggnog, where the eggs aren’t raw.
Note: to make eggnog this way, ones needs a Vita-mix or some other high-powered blender, the ones that run fast enough that you can actually heat soup with them. Otherwise you’ll need to take some other route, one that involves tempering your beaten eggs before gently heating them to 165 degrees on a double boiler, which I am far too impatient for. Or trusting that you’ve sourced your eggs from somewhere safe enough that you don’t mind eating them raw. Or blending them up at the outset with sufficient alcohol to kill anything that could possibly be living in them. (Most people deem any of these options as pretty safe.)
I, however, really like the flavor of cooked, custardy eggnog; the cooked eggs taste different, and I love it.
Here’s the recipe for about a quart of boozy eggnog:
Ingredients:
- 4 eggs
- ½ cup sugar
- ¾ cup brandy, rum, bourbon, or a mixture of the above
- 2 cups half and half (or mixture of heavy cream and milk, or non-dairy milk) (note: if you leave out the booze, increase to 2.5 cups)
- 1 tsp vanilla
- 1 tsp nutmeg
To make:
Blend eggs, sugar, and alcohol in Vita-mix or other high powered blender on highest speed for about 4 minutes; steam should be rising to the top and the texture should be uniform and a little thick.
Reduce blender speed to medium.
Add half and half, drizzling into custard mixture in a stream
Add vanilla and nutmeg and blend a little longer
Refrigerate almost indefinitely, although please do not take my word for it I’m a musician not a food safety specialist. Some people age their eggnog a year or more, though I’ve neither dared to try nor let mine last that long anyway.
Seriously good stuff. Like, way better than any commercial eggnog I’ve had, with the possible exception of Organic Valley, which has not been available for a couple of years. (That link goes to their recipe, but it’s way more complicated than the blender version!)
I can haz KHEER! (Instant Pot Indian Rice Pudding)
 Most people probably go to Indian restaurants for the lovely delicious curries and entrees…weirdo that I am I mainly go for two things: the fresh-from-the-oven naan, and the kheer, a delicious soupy cardamom-spiced rice pudding. I’ve attempted to make it time and time again, and it’s never right. So I finally gave up.
Till now. When my friend Beena told me how a lot of Indian cooking not only is better in but depends on a pressure cooker, I figured it was time to try again.
It worked. Easy. Delicious.
Ingredients:
- 1/2 cup basmati rice
- 4 cups milk
- 1/2 cup sugar
- 1 tsp cardamom powder
- 1/3 cup sliced, chopped, or slivered pistachios or almonds (my daughter is allergic to pistachios, which is why we never to go Indian restaurants as a family)
- 1/4 cup raisins if you want (I don’t care for them in my rice pudding)
Directions:
- Place rice and milk into Instant Pot
- Cook 20 minutes on high pressure on manual, then let pressure release naturally (about 15-20 minutes).
- Open lid. Stir; rice will be very soupy. Stir in sugar, cardamom, and nuts.
- Let cool; it will thicken as it stands
That’s it. (Although I bet a splash of rosewater would be lovely…)
This was incredibly easy–I will make this again and again. I can haz kheer! At home! On my own!
Instant Pot Curried Lentils and Rice
I found another one! A healthy and completely hands-off Instant Pot recipe.
One of my favorite things to cook, especially when I’m trying to get a handle on my junk food and too-much-meat eating habits, is a nice spicy mixture of green lentils and brown rice. But I haven’t been able to find any recipes online for what I was looking for for the Instant Pot.
So, as is my way, I made something up myself. And it’s exactly what I wanted. I’ll be making this a lot. Not super-fast, honestly, but the hands-off aspect is not to be beaten.
 Ingredients:
- 1 cup green or brown lentils
- 1 cup brown basmati rice
- 1 bell pepper, chopped
- 1 medium onion, chopped
- 2-3 cloves minced garlic
- 2 1/2 cups water or stock
- 3-4 tbs. curry powder (I use mostly mild and 1 tbs sweet; it depends how hot you like it!)
- 1/3 cup coconut milk or yogurt (opt)
Put all ingredients except coconut milk into the Instant Pot, cook on Manual 22 minutes, let sit on slow release another 15-20 minutes, release pressure. If desired, stir in 1/3 cup or so coconut milk or yogurt. (You could probably make it with coconut milk subbing for some of the stock too if you wished.)
(Disclosure: whenever in a recipe I say “a bell pepper and an onion, chopped”–I mean “drop in a bag of Trader Joe’s frozen bell peppers and onions.” I buy about 10 at a time and have to replace them frequently. )
This is excellent! It will become one of my take-to-work lunch staples.
With the rise of Alt Govt, Twitter is suddenly fun again…
 This has been a terrible week.
I don’t even know how to start dealing with this crazy man in the White House, or the cadre of corporate grubbers surrounding him. I don’t know what to protest first–the loss of environmental regulations, the idea that profit should come before safety (something the REINS Act actually wants to enshrine into our legal system), or the apparently serious assertion that the job of the press should be to “keep its mouth shut” and not report anything the Administration doesn’t want reported.
Then there was Twitter, and the National Park Service, which was apparently shut down (the Twitter feed, not the Service itself) for retweeting comparative photos demonstrating the size of the crowds at the inauguration. And which then came back up immediately after it posted an “apology” for its “mistaken Tweet.” Now they are posting cute animal photos and lovely vistas.
But then…Badlands National Park went rogue, and now there are “alt” Twitter feeds from a bunch of agencies. Or people at the agencies. Or people who used to work for the agencies. Or people who never got anywhere close to the agencies. There’s honestly no documentation at all to in any way prove that the rogue accounts are who they say they are. But…for the first time since I’ve attempted to use it…Twitter is fun again.
Instant Pot Apple Spiced Oatmeal
We don’t do family breakfast often, but when we do, we do it really well…
This was delicious. On the one hand, with the slowness of the pressure thing it took a lot longer to Instant Pot this than it would have taken on the stove…on the other hand, the texture was way nicer than stovetop rolled oats, and it required no babysitting or stirring. So worth it maybe? I haven’t done steel cut oats yet because we love them so much in the slow cooker, but I’ll try that next…
Ingredients:
- 2 cups old fashioned rolled oats (not instant!)
- 3 1/2 cups water
- 1/2 cup apple butter
- 2 tbs brown sugar (optional–didn’t really need it!)
- 1 tsp cinnamon
- 1/2 tsp nutmeg
- 1/2 tsp ground ginger
Directions:
- Add all ingredients to Instant Pot and stir
- Set for “Multigrain” for 4 minutes; cook and quick-release the pressure
- Stir and serve
Could that have been any easier? It did take something like 15 minutes to come up to pressure, which made this not a quick breakfast, but it was still amazing…
Instant Pot Balsamic Chicken with Rosemary
Another successful Instant Pot recipe: I forget where I adapted this one from, but it was easy and delicious.
Ingredients:
- 1-2 tbs vegetable oil
- 1 medium onion, diced
- 5-6 cloves of garlic, thin sliced (or less if you want; we love garlic)
- 1 sprig rosemary, chopped
- 8 boneless skinless chicken thighs (breasts or tenderloins would be lovely too)
- 1/2 lb mushrooms
- 3 tbs balsamic vinegar
- 1/2 cup chicken stock, wine, or water
- 3 tbs flour
- 3-4 tbs cool water
Directions:
- Set Instant Pot to Sauté setting. Heat oil until hot and shimmery; sauté onions and garlic in the oil till soft; add rosemary and stir a little more.
- Add mushrooms and a splash of stock; stir till mushrooms soften
- Add chicken, balsamic vinegar, and the rest of the stock.
- Using “Manual” setting, cook on high pressure for 15 minutes; quick-release the pressure and remove lid.
- While chicken is cooking, mix the flour and water together to make a slurry and stir till it’s not lumpy
- Stir a little hot liquid from the pot into the slurry, then pour the mixture into the pot and stir a few minutes till it thickens into a gravy. Add salt and pepper to taste
- Serve over rice or pasta.
This might be my favorite thing so far that I’ve made in the Instant Pot…even after not very long, it tasted like it had been simmering all day…
Instant Pot Chicken Curry
Tonight’s entry in the Instant Pot experimentation…and my first dive into even semi-authentic Indian cooking. I started with this recipe from Skinnytaste.com…and then changed it a whole lot. (But it looks delicious as is!)
Ingredients:
- 1-2 tbs vegetable oil (I used 1 tbs oil and 1 tbs butter)
- 1 medium onion, diced
- 2 tbs curry powder, preferably homemade (I used Alton Brown’s recipe, but without the cayenne so as not to scare my kids)
- 6 boneless skinless chicken thighs
- 1 chopped bell pepper
- 1/2 large head cauliflower
- 1 large or 2 small carrots, sliced
- 1/2 cup water
- 1/2 cup light coconut milk
- 1/2 cup plain yogurt
Directions:
- On Sauté setting, heat oil. Sauté diced onion till soft.
- Add curry powder and stir to coat the onions and bring out the fragrance
- Add chicken thighs and vegetables, stir to coat with spices
- Add water and coconut milk; stir
- Set Instant Pot on “Manual” for 15 minutes; wait till cycle is finished. (In the meantime, either be glad that you made some nice basmati rice in your IP earlier, or bummed that you didn’t and make some in some other appliance, like a pot on your stove…)
- Quick-release the steam, then taste for seasoning (I added a little salt at the end.)
- Stir a little of the hot liquid into your plain yogurt, then stir the yogurt into the curry.
- Serve over hot rice.
This was completely delicious; the curry seasoning was very very mild and a little sweet, but you could use whatever you’d like to season it. Tomatoes would be nice in this too, if you didn’t have anti-tomato kids like me.
Lovely dinner!
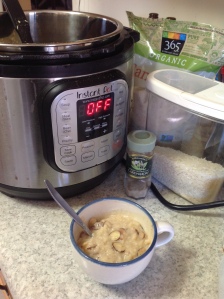
I’m back…and I have an Instant Pot!
I got an Instant Pot for Christmas.
And suddenly this blog, almost defunct for so long, is perhaps returning to its former existence as “a place to post recipes so I don’t lose them.”
I loved blogging when I did it regularly, but after a few years and over 700 posts about trying to make life a little greener, I sort of…ran out of things to say. I mean, I still try to do it, but it’s not like I’m thinking of new things, just trying to keep doing as much of the stuff I was doing.
And then I got this Instant Pot. For those who don’t know, it’s this electric cooking thing that is much more energy-efficient than the stove, and in which you can saute, boil, pressure cook, slow cook, steam, and God knows what else. (It also makes yogurt, although so can almost anything, so I’m less impressed with that. I do that in my slow cooker.) I’m using it almost daily, and in fact three times today, and making some really fun things. I’ll try and post about them as I make them, so I don’t lose track.
The caveats about the Instant Pot: The timings the recipes give for pressure cooking do not count the time it takes for the pot to come “up to pressure”–which means everything has to heat up to a certain point in order for the little floating pressure valve to seal–and that part is difficult to predict and sometimes quite slow. On the other hand, even if it’s slow, it’s a lot quicker usually than the same thing on the stovetop, and it’s completely hands-off. The stainless steel inner pot is, at least so far, very easy to clean…but the lid tends to hold odors from whatever you’ve cooked most recently, unless you have cooked tomato sauce and/or garlic at any time, in which case it smells like that indefinitely. That said–I have made rice pudding in it while the lid still smelled like marinara, and the pudding was lovely and had no trace of the other smells.
The pressure function tends to kill the subtler flavors of herbs and spices, so it’s best to add those at the end.
The beauty of it–I barely need recipes most of the time. I can make most of the things I would have otherwise used my slow cooker or dutch oven for, and just sort of improvise. And that’s after only a couple weeks of use.
The thing is a gem. I am not one to jump onto the gadget bandwagon (remember how slow I was to embrace the Vita-Mix?), especially in my small kitchen without much storage space, but this is worth its real estate.
Recipes to come!
Banana Oat Nut Protein Cookies (with or without chocolate, with gluten free option!)
I have a middle-schooler now, and he’s in cross country. They have meets after school. He needs good snack food. He also needs a lot of food; he’s at that “bottomless pit” stage right about now–the only time he’s not hungry is when I put vegetables down in front of him at dinner time.
 Last week I found this recipe for “Banana Oatmeal Breakfast Cookies.” I’ve now tried them in three different iterations and proceeded to mess with the recipe a good bit, and in all versions they were pretty darned good. The kids scarf them down like there’s no tomorrow. Even when there are no chocolate chips in them. The Boy can take them to his practices and meets and be filling up with something that takes most of its calories from good protein-y things. (Except for the chocolate chips.)
So, here are the different versions–if you want to go gluten free, substitute almond flour for the whole wheat flour, and make sure you start with gluten-free oats if the trace amounts of gluten will mess you up. I’ve tried both, and they are both really good. Honestly, I bet oat flour would work just as well, or any basic gluten free flour (except coconut), since there’s not much of it and the oats carry most of the weight.
Banana Oat Nut Protein Cookies (with chocolate variation)
In a medium-sized bowl, mix:
- 1/2 cup mashed banana (about 1 large)
- 1/2 cup natural peanut, almond, or other nut butter (or non-nut butter for allergies)
- 1/3 cup maple syrup or honey (recommend maple syrup for the chocolate variation)
- 2 tsp vanilla
Add, all at once (or mix the dry ingredients separately)
- 1 cup rolled oats
- 1/4 cup whole wheat flour (or almond flour for gluten free)
- 1.5 tbs ground flax seed
- 1.5 tbs oat bran (for the oat bran and flax seed, you could use all oat bran or all flax seed if you want)
- 1/4 cup powdered nonfat milk (or vanilla protein powder, but I don’t really like it) (for chocolate variation: 2 tbs each nonfat milk and unsweetened cocoa powder)
- 1 tsp ground cinnamon or other spice (omit or reduce for chocolate variation)
- 1/2 tsp baking soda
- 1/2 tsp baking powder
- 1/2-1 cup dried cranberries or raisins (or chocolate chips–especially if you used peanut butter)
The batter will be very gloppy, and it will spread only a little while baking. Drop by teaspoonfuls (for little cookies) or tablespoonfuls (for bigger cookies) onto parchment-covered cookie sheets and flatten; bake at 350° for 15 minutes or until slightly brown on the bottom.
So bottom line: for the “healthiest” version, leave out all chocolate and chips, and use cinnamon and unsweetened dried fruit. If you want a little choco-kick, add the other stuff. Notice the only fat in the recipe comes directly from your nut butter and/or almond flour, so it’s all to a good cause. Fat ain’t evil. But note that as good-ingredient-filled as these are, they are not low calorie. I did some calculations and figured out that if you make 2 dozen cookies from this recipe, it’s about 80-ish calories per cookie, more if you use almond flour and/or chocolate chips.
A note about the oats: I’d recommend starting with quicker rolled oats rather than the thick “old fashioned” ones, unless you like the chewy texture; the baking time isn’t long enough to really soften the oats if you start with bigger ones. I’m told you can toss thick-cut rolled oats in the food processor for a few pulses to break them up and they’ll work even better. I happen to like the chewy, oaty texture of the old fashioned oats, but I know not everyone does.
Let me know if you try these, and what other fun variations you might come up with!
Feeling hot hot hot! (Pepper sauce and dried chilis!)
 Since this year for the first time ever my pepper patch sort of exploded, it was time to brave another of those recipes for “things I know get made somehow but I never quite really thought about it”–two, actually. This week I made hot pepper sauce and dried chili powder, both for the first time. Both ridiculously easy, if a little time-consuming–and it’s low-maintenance time, so no problem there.
Yes, I’m supposed to be writing my dissertation now, but I wanted to write this down before I lose the links and/or forget how, as easy as it was:
Hot Pepper Sauce
- In a blender, cut up a bunch of hot peppers, preferably several varieties at varying levels of hotness, but it’s up to you. Take out the stems, but leave everything else. Use gloves, or a baggie over your hands. If you ignore this last piece of advice, whatever you do, don’t rub your eyes or pick your nose for several hours and washings afterward.
- Pour some white vinegar over the peppers in the blender. Recipes I found say to pour enough to cover the peppers, but I didn’t; I maybe half-covered them. Also toss in a small handful of salt. (I did maybe a teaspoon for what amounted to a cup and a half of sauce. It’s up to you.)
- (Next time I’m going to throw a couple of garlic cloves in there as well…)
- Blend on high speed till smooth. Or as smooth as you’d like, anyway.
- Transfer pepper puree into a saucepan and bring to a boil on medium heat. At no time between opening the blender and boiling the liquid should you put your face in range of the fumes. This stuff is serious.
- After the liquid boils, turn off the heat and let cool, covered, for an hour or two. Transfer to a mason jar and refrigerate for several days.
- After a few days, you should see the pepper sauce settling into two layers; the vinegar floats to the top, and the peppers sink to the bottom. This is good. Skim off as much of the vinegar layer as you can, and re-refrigerate. Taste cautiously, and then use to your heart’s content.
This stuff should keep a really long time, but I leave others to do their own research on that. My very first batch is ugly as sin (mostly because the peppers in it were a good mixture of green and red, thus the sauce is sort of sludge-colored), but it’s delicious.
Dried Ground Chilis
This took a little more work but was also really easy…
- De-stem and cut up a bunch of chili peppers of varying varieties; we mixed the hot skinny mystery peppers from the garden with some basic ordinary jalapenos; next time I’m going to add banana peppers and poblanos to the mix for more flavors and less heat…(Wear gloves. See above.)
- Scatter loosely on a cookie sheet on parchment paper so there is plenty of room to circulate; set oven on its lowest setting and put the peppers in for a total of 24 hours or so. Ideally you want something between 120 and 140 degrees; my oven only goes as low as 175, so I alternated on and off–5 hours on, 5 hours off, overnight on, morning off, and so on. The key is to dry them, not to cook them.
- At the end of this time, carefully check the peppers; if they are absolutely solid and brittle, without a hint of flexibility, they are ready. If they have any bend to them, put them back for another 10-12 hours. You want every bit of moisture pulled out.
- Once they are ready, you have options: You can store them almost indefinitely in their chunky dried form and grind them later, or you can put them into a blender or food processor or, I guess, spice grinder and pulverize them as much as you want–you can stop at “red pepper flakes” for sprinkling onto pizza or take it all the way to “chili powder.” This would also be a good time to add other spices, like cumin or garlic or oregano, so you’ll just have an awesome mixture to toss into your chili whenever you make it. (You can do your own internet search for that!)
So…that’s it! Really easy, and pretty seriously yummy, and I can’t wait to keep going with the dozen or so peppers still out there doing their peppery thing in the garden…


